The original of this document is here (Korean).
Preliminar words
This blog post is a re-work of the amazing tutorial from Abdelrahman G. Abubakr on how to create your own object detector with Object Detection API from Tensorflow 2. I am following the same steps as the tutorial, but I did a little differently to fit my development environment and design system research. I want to thank the author for the original content and everyone who wrote it for reducing my trial errors.
Also I have to say that I have developed this experiment in my research time working at LINE corporation where I perform as a platform designer of Design system.
Background
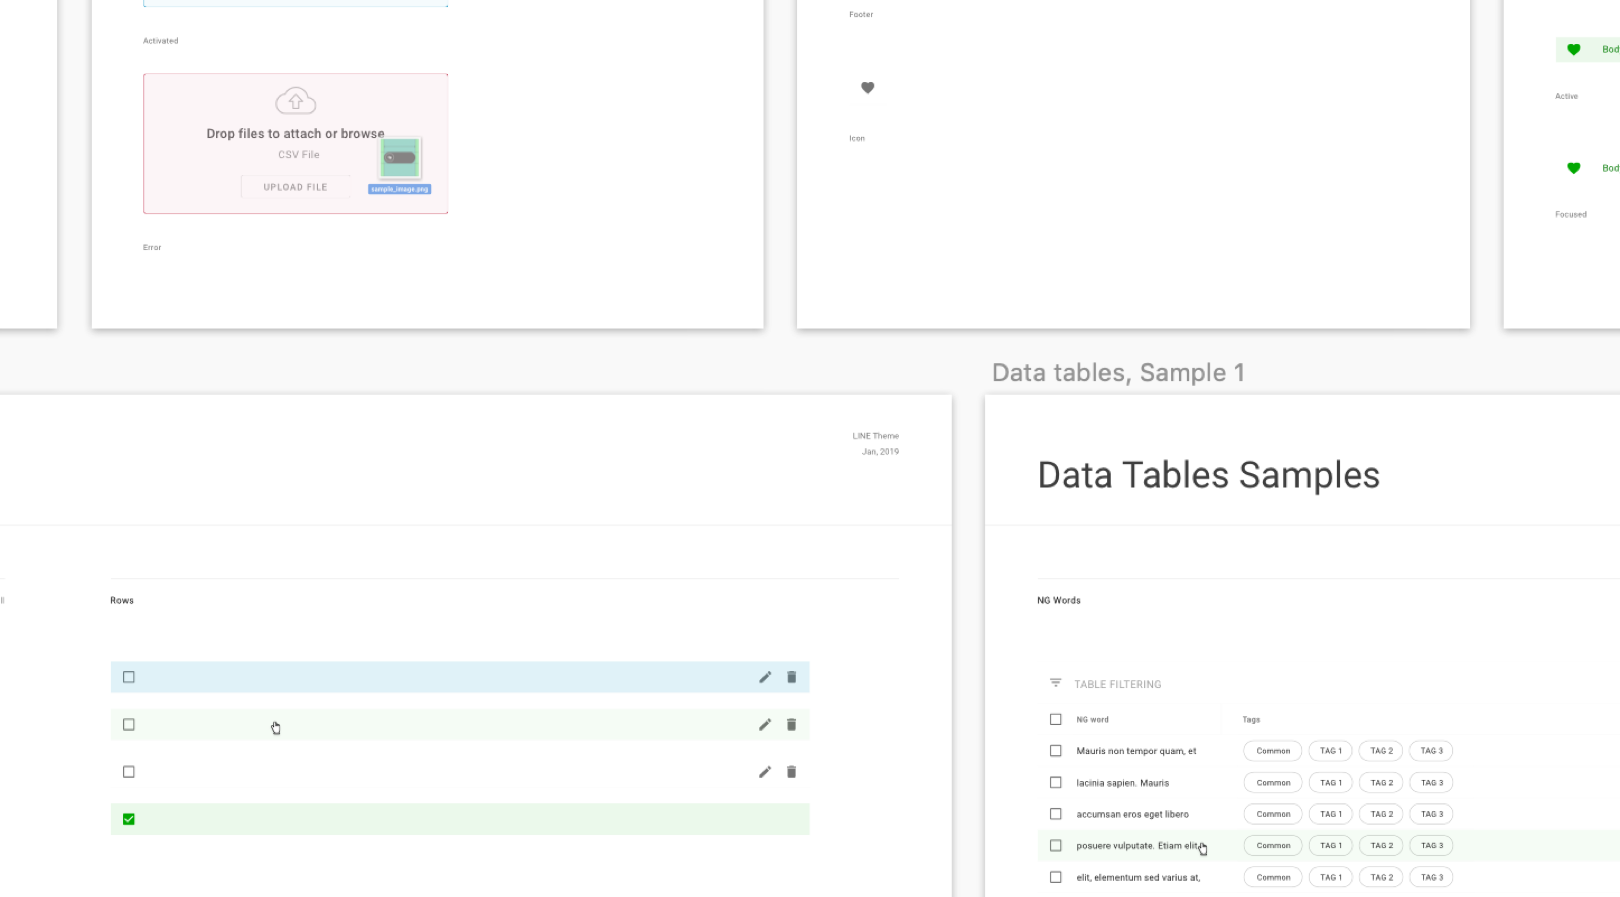
This idea started with my difficulty of creating a design system. The heart of the design system is to assemble design elements and create reusable libraries. But ironically, increasing resources in libraries (such as the Sketch symbol library), on the contrary, makes it increasingly difficult for designers to use in their design because the more complex the library, the more they have to learn, as well as the heavier the working environment.
As a design system manager, this was a serious challenge. So I thought, What if Sketch Assistant could automatically detect which UI components are being used on the artboard, and recommend designers to use library symbols through the Assistant? A simple flow is shown below:
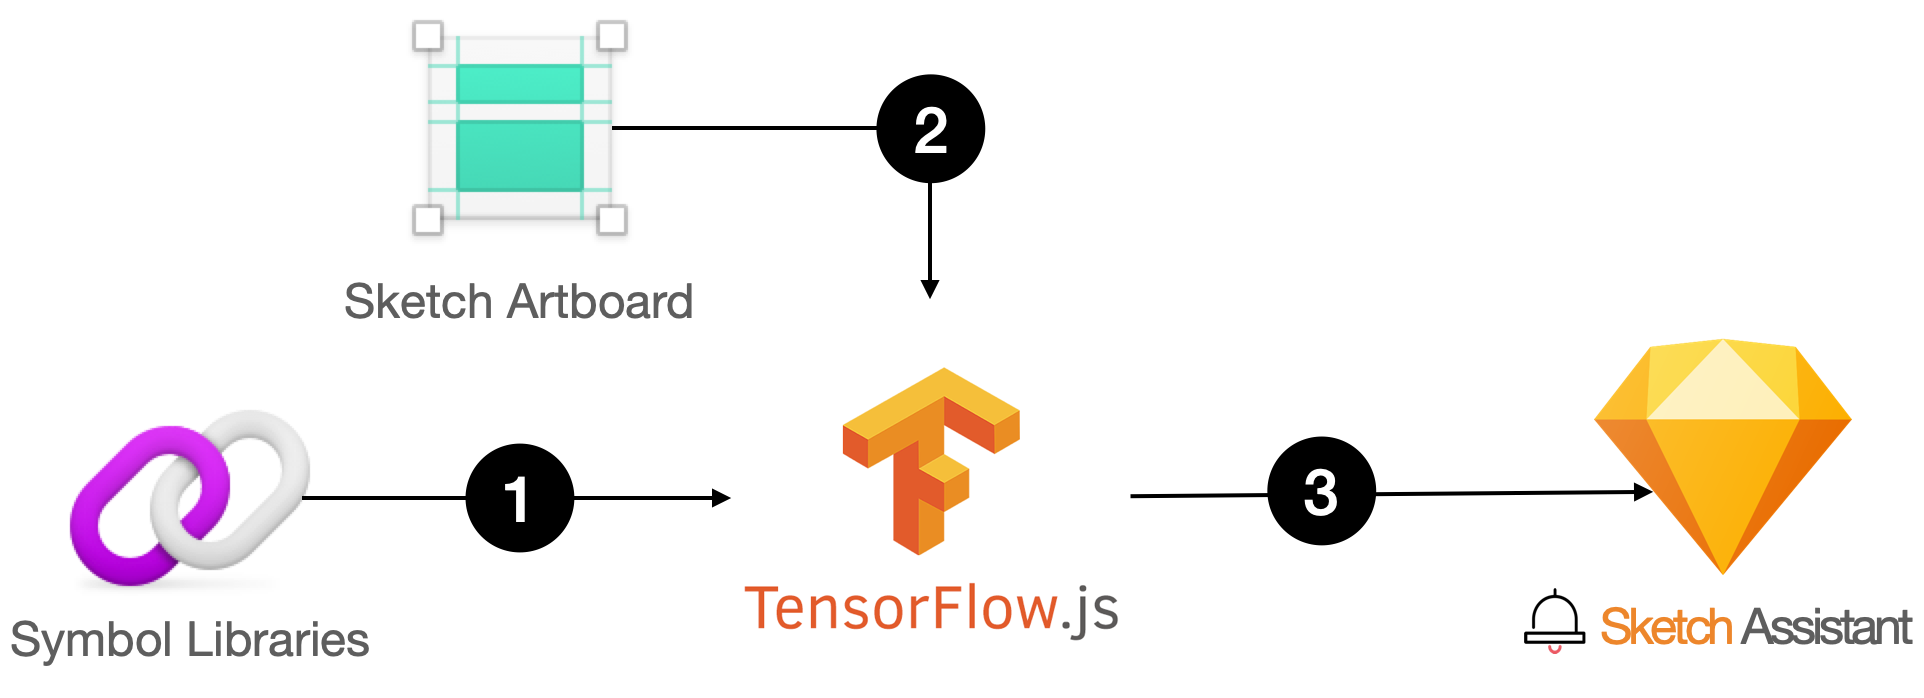
- Machine learning the design system, (Custom dataset)
- Detecting the UI components in the artboard, (Object Detection API)
- Notify designers of UI elements that do not use the design system. (Sketch Assistant)
After thinging the flow, I decided to start by creating a Custom dataset first.
Setting-up a working Python environment
Firstly, I set up the Python virtual environment and installed Tenserflow according to Tutorial of Abdelrahman G. Abubakr.
direnv
First, I used a virtual environment with direnv. It’s also okay to use Anaconda or other virtual env tools, but I personally prefer to use direnv because it’s comfortable to define the necessary settings for each directory via .envrc.
I can easily install it using Homebrew
1
brew install direnv
Next, add it to the configuration file corresponding to shell. direnv officially supports BASH, ZSH, FISH, TCSH, Elvish, Check out the guide here, and add settings for your shell.
After adding the settings, reboot the terminal and you can use direnv.
1
2
3
4
5
6
7
8
9
10
11
12
13
14
15
16
## BASH -> Add below content to ~/.bashrc
eval "$(direnv hook bash)"

## ZSH -> Add below content to ~/.zshrc
eval "$(direnv hook zsh)"

## FISH -> Add the following to ~/.config/fish/config.fish
eval (direnv hook fish)

## TCSH -> Add the following to ~/.cshrc
eval `direnv hook tcsh`

## Elvish -> execute the command below
$ direnv hook elvish > ~/.elvish/lib/direnv.elv
## Then add the following to ~/.elvish/rc.elv
use direnv
Next, choose a folder you want to work at and create a directory named Tensorflow.
1
2
$ mkdir TensorFlow
$ cd TensorFlow
Temporarily creates a .envrc file.
1
2
$ touch .envrc
direnv: error .envrc is blocked. Run `direnv allow` to approve its content.
When a .envrc file is created, direnv will detect it and print a warning message. The reason is to prevent unwanted shell script execution from happening. Therefore, if we want to add or change the .envrc file, we must explicitly allow it.
Execute the allow command to allow the use of the .envrc file in the current directory.
1
2
$ direnv allow
direnv: loading .envrc
pyenv
Next, we will download the Python version to use using pyenv. Since I manage the virtual environment in direnv, I will only use pyenv for version control of Python.
1
2
3
brew install pyenv ## install pyenv
pyenv install --list ## search available python versions
pyenv install 3.7.0
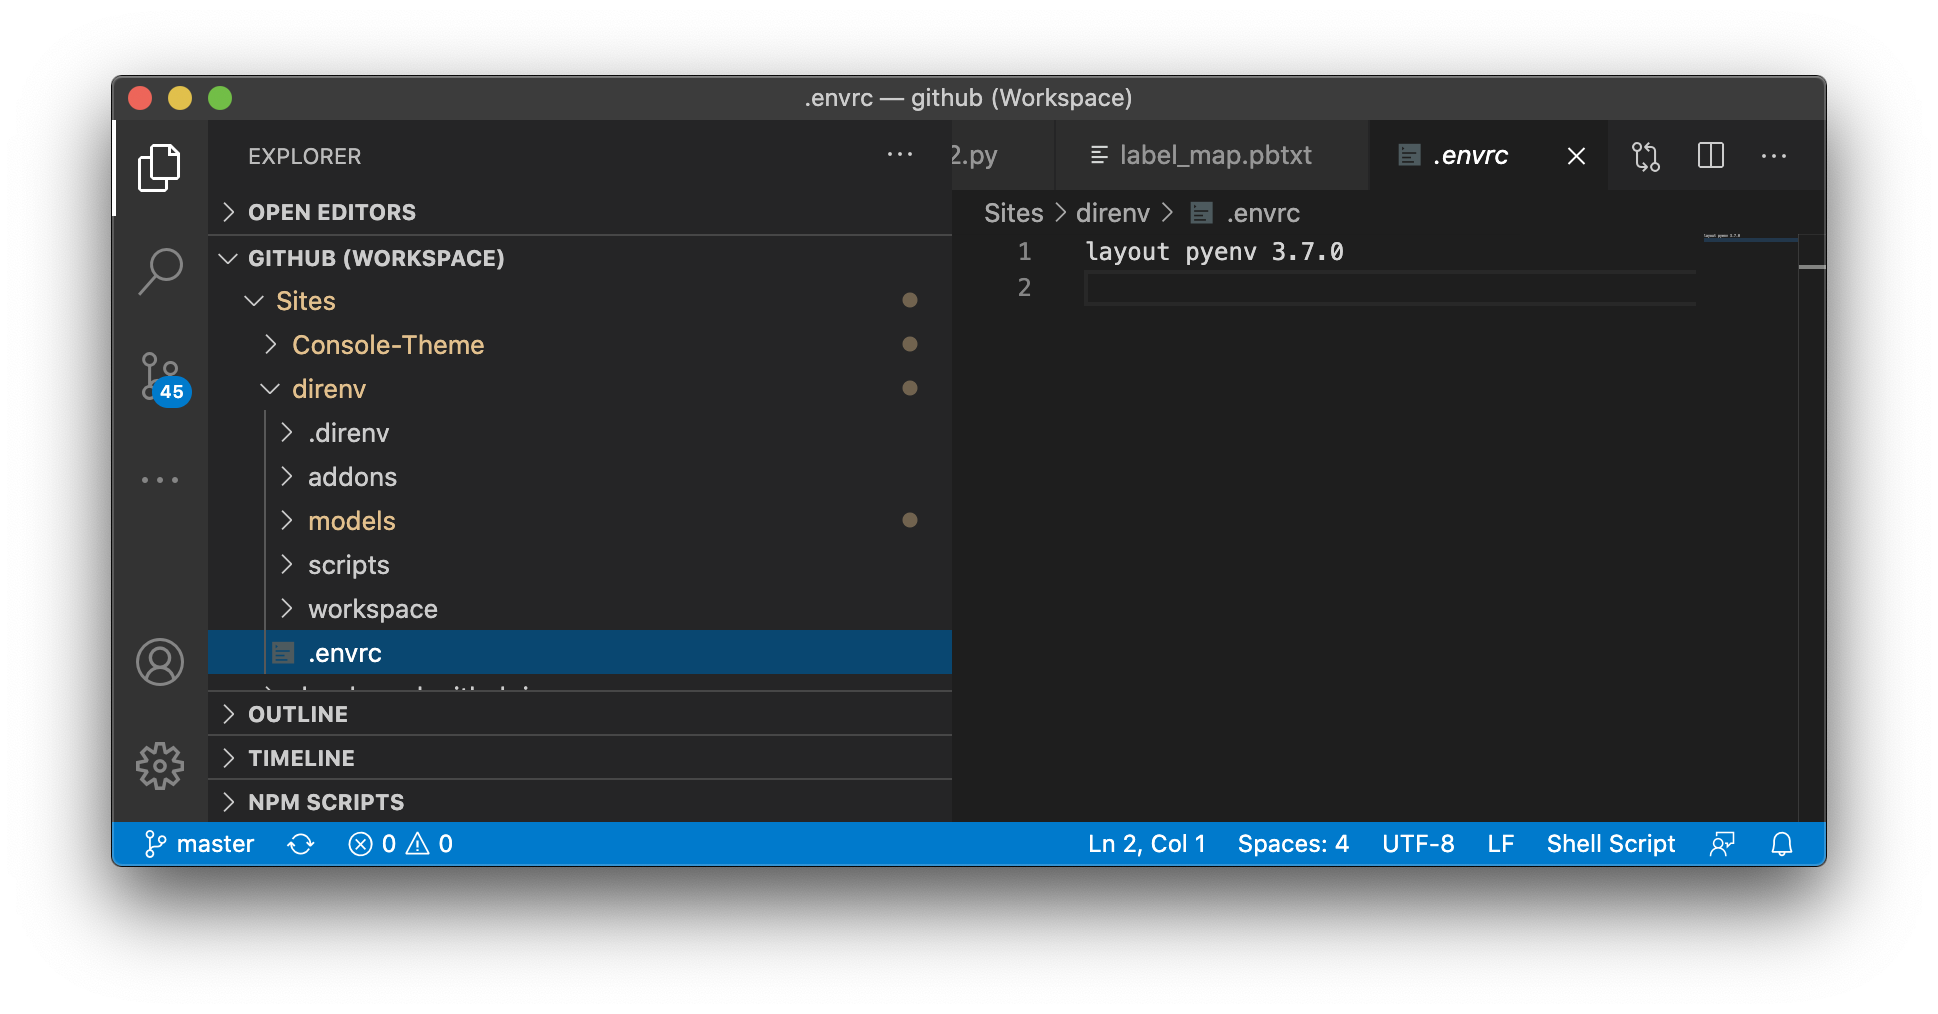
After installing Python, specify the environment in the .envrc, and restart the terminal to set up the virtual environment in that directory.
A more detailed installation guide can be found at direnv wiki.
Installation
Tensorflow2 installation
Refer to the Tensorflow official site and install Tenserflow in my Python virtual environment in the following way. (As of September 2020)
1
2
3
4
5
## Install the latest version of Tensorflow 2
pip install --upgrade tensorflow

## Installation validation
python -c "import tensorflow as tf;print(tf.reduce_sum(tf.random.normal([1000, 1000])))"
For reference, when I run the installation verification code (tf.reduce) on my MacBook Pro, the following message is displayed. Fortunately, the forums say we can ignore this now. https://github.com/tensorflow/tensorflow/issues/8037
1
I tensorflow/core/platform/cpu_feature_guard.cc:142] This TensorFlow binary is optimized with oneAPI Deep Neural Network Library (oneDNN)to use the following CPU instructions in performance-critical operations:  AVX2 FMA
Object Detection API installation
Now open a terminal, go to the TensorFlow directory and clone the Tensorflow model repository.
1
2
cd TensorFlow
git clone https://github.com/tensorflow/models
You should now have a single folder named models under your TensorFlow folder, which contains another 4 folders as such:
1
2
3
4
5
6
7
TensorFlow/
└─ models/
   ├─ community/
   ├─ official/
   ├─ orbit/
   ├─ research/
   └── ...
Since Object Detection API use .proto files and these files need to be compiled into .py files in order for the Object Detection API to work properly. So we should install protobuf for compiling these files.
1
2
3
4
5
6
7
8
9
10
11
12
# Install Compiler (version >= 3.0)
brew install protobuf

# Go to models folder
cd models/research

# compile protos:
protoc object_detection/protos/*.proto --python_out=.

# Install TensorFlow Object Detection API as a python package:
cp object_detection/packages/tf2/setup.py .
python -m pip install .
After that, cd into TensorFlow/models/research/ directory and run the following command:
If OK comes out, the test is successful :)
1
2
# From within TensorFlow/models/research/
python object_detection/builders/model_builder_tf2_test.py
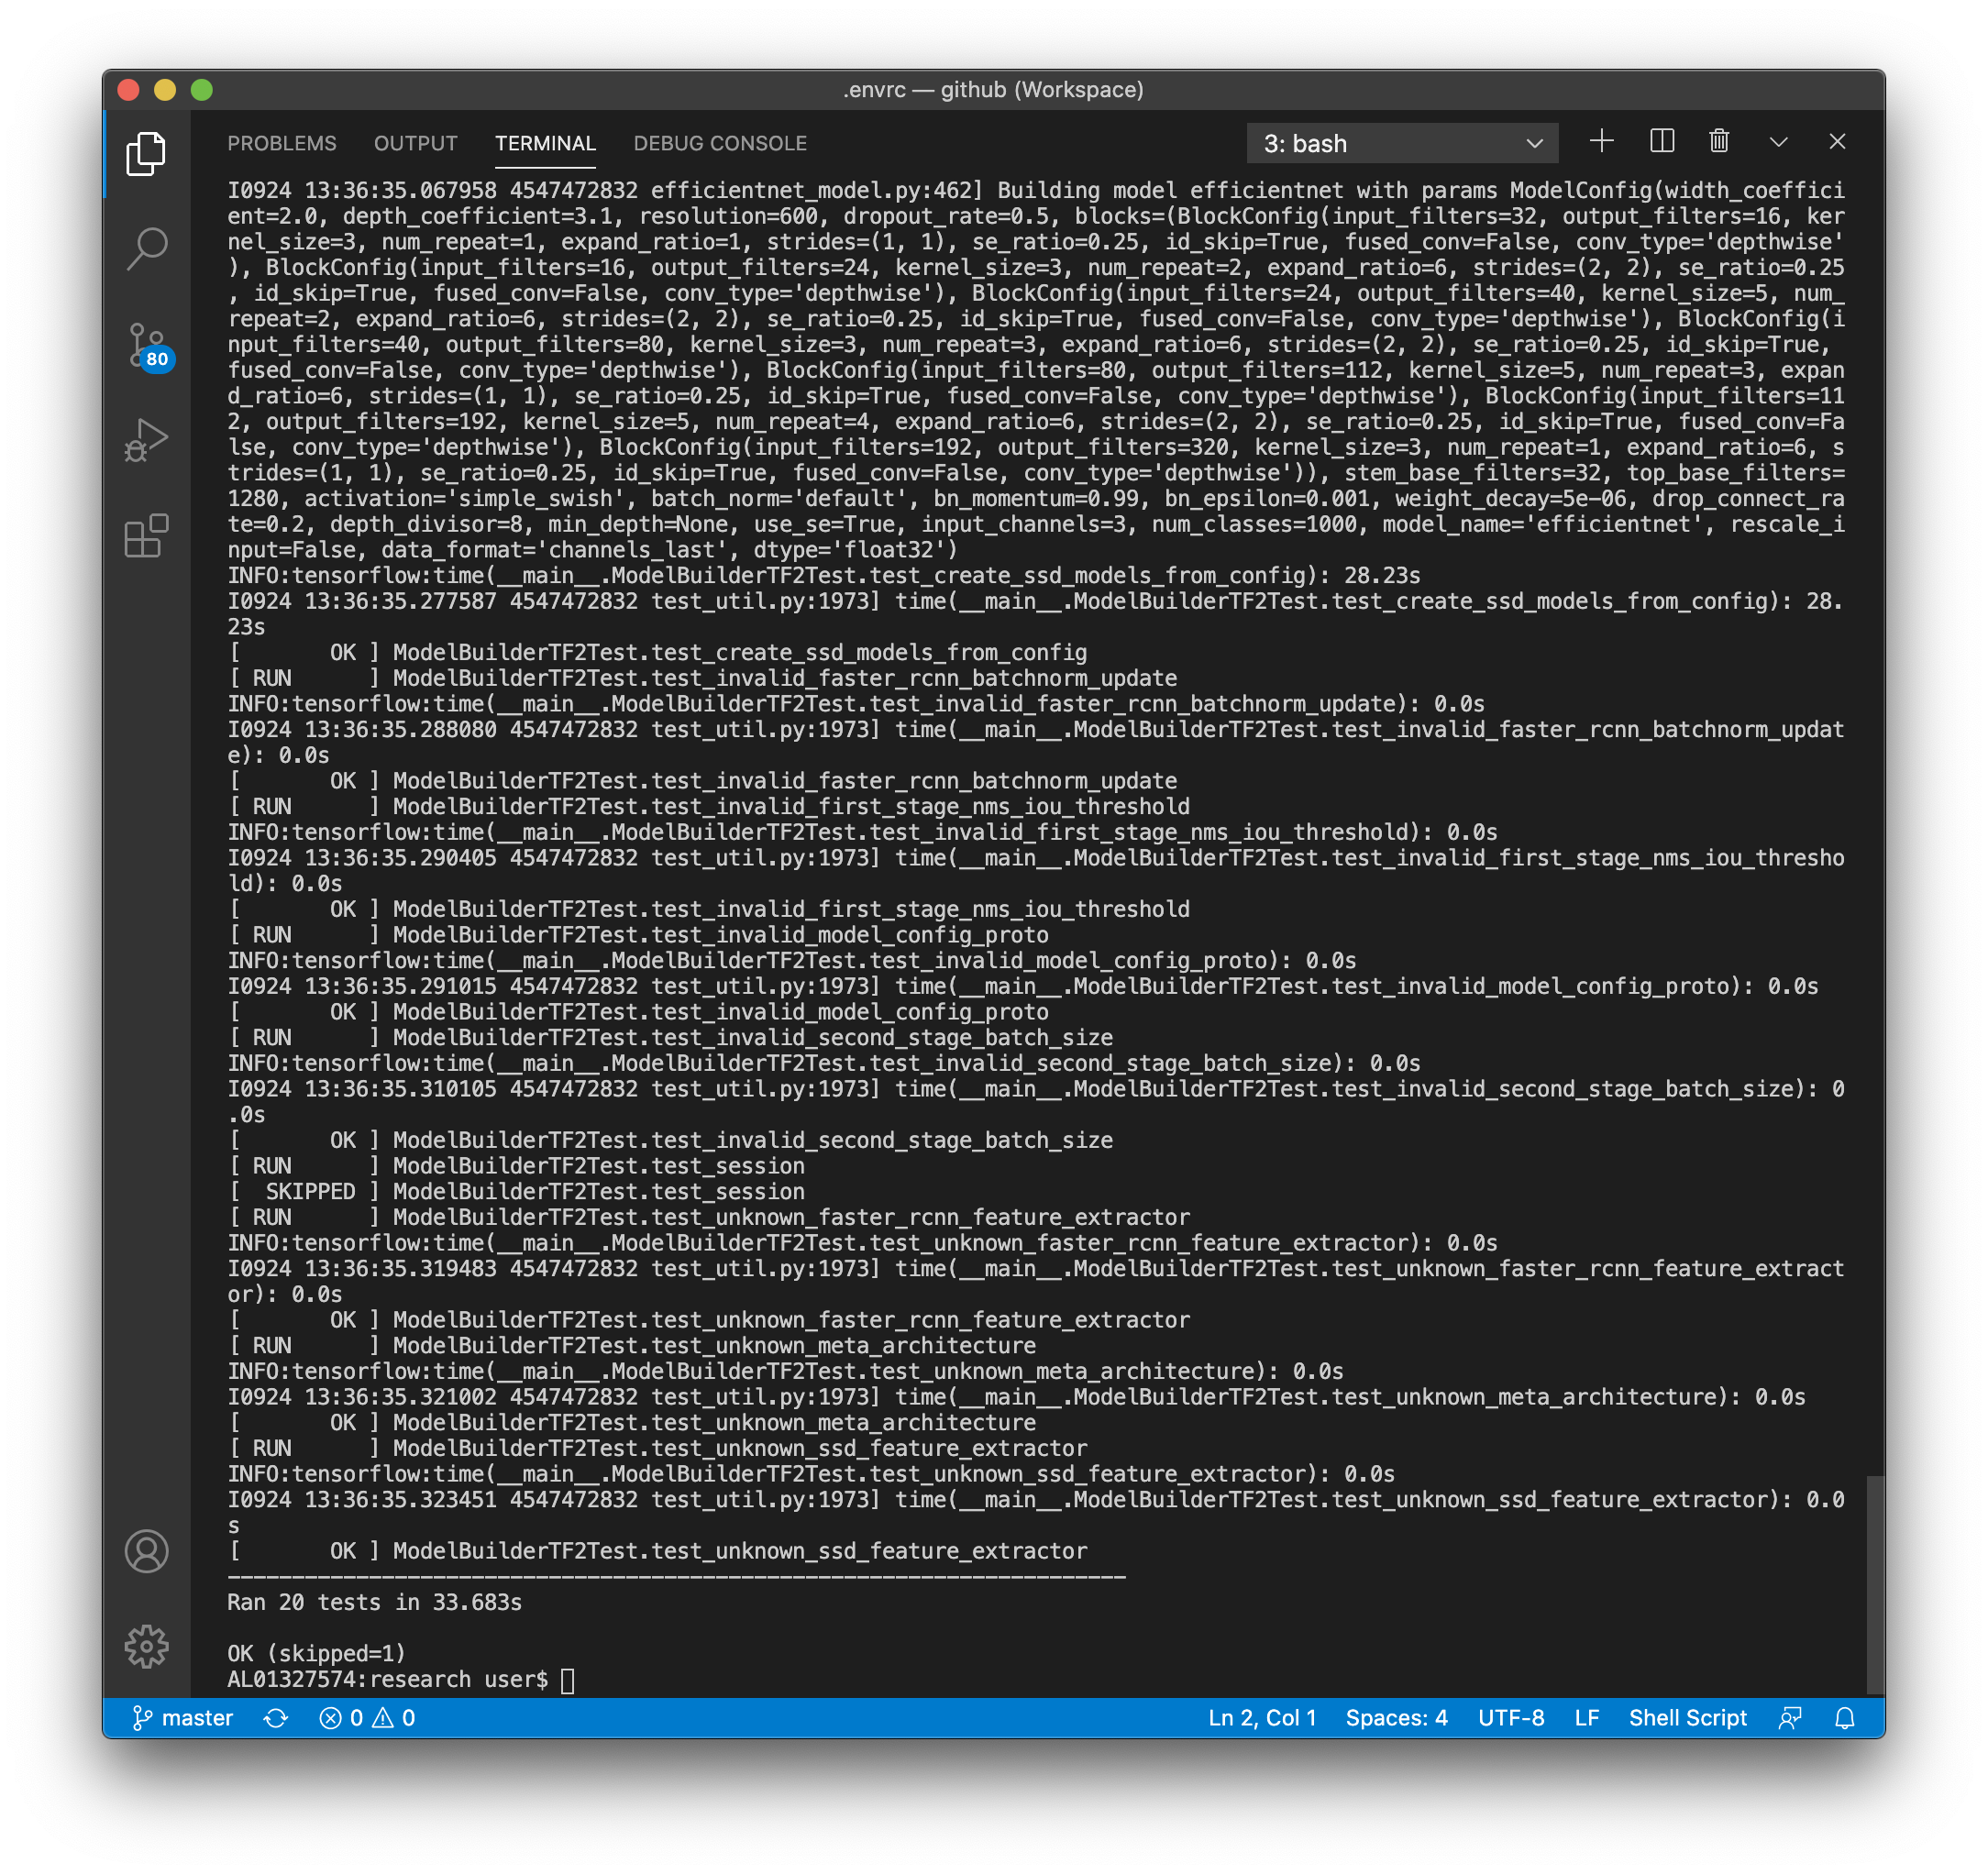
If you want to see the test results in front of your eyes, use the test script from Tutorial by Abdelrahman G. Abubakr. Choose one of the pre-trained models provided in tf2 detection model zoo and put it in the test script, you can see the test result as follows:
the pretrained EfficientDet D0 model: See more

Training UI dataset
STEP 1. Preparing the Workspace
Now create a new folder under TensorFlow and call it workspace. It is within the workspace that we will store all our training set-ups. Now let’s go under workspace and create another folder named training_demo. Now our directory structure should be as so:
1
2
3
4
5
6
7
8
9
TensorFlow/
├─ models/
│  ├─ community/
│  ├─ official/
│  ├─ orbit/
│  ├─ research/
│  └─ ...
└─ workspace/
   └─ training_demo/
The training_demo folder shall be our training folder, which will contain all files related to our model training. It is advisable to create a separate training folder each time we wish to train on a different dataset. The typical structure for training folders is shown below.
Source: https://tensorflow-object-detection-api-tutorial.readthedocs.io
1
2
3
4
5
6
7
8
9
training_demo/
├─ annotations/
├─ exported-models/
├─ images/
│  ├─ test/
│  └─ train/
├─ models/
├─ pre-trained-models/
└─ README.md
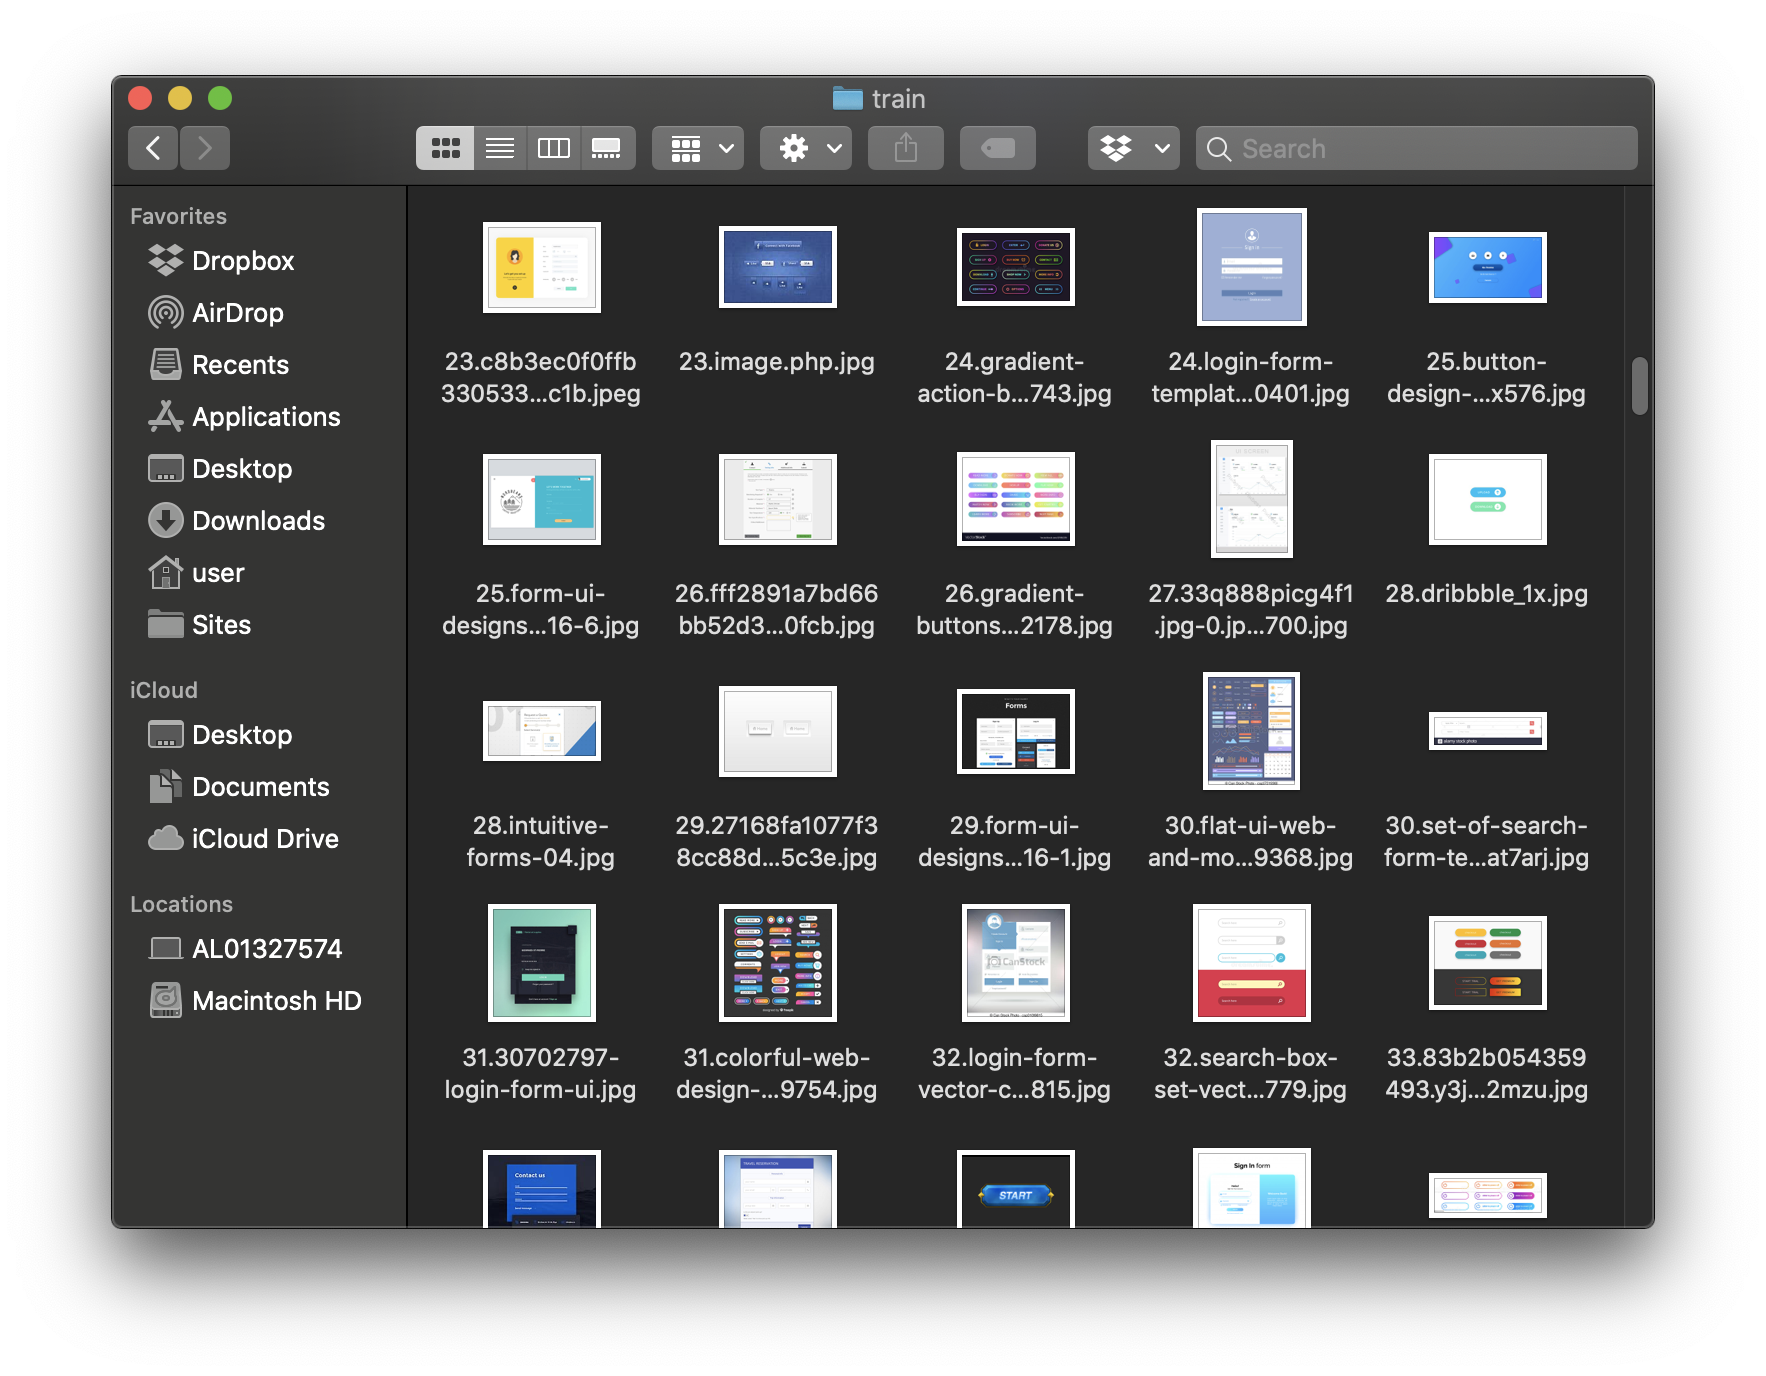
STEP 2. Gathering data
For our purpose we are going to use a bunch of images regarding with Button UI component. To do that as fast as possible we are going not only to extract button images from our symbol library but also to scrap google images with a python script to automate the process.
Scripts can be downloaded from: https://github.com/hardikvasa/google-images-download
and, for example, place the downloaded files in projects folder named as google-images-download. Then just navigate to the folder where the python script is and execute:
1
 googleimagesdownload --keywords "button ui design" --f jpg --size medium --output_directory ./button
Next, move about 90% of images into /images/train directory and the other 10% into /images/test directory.

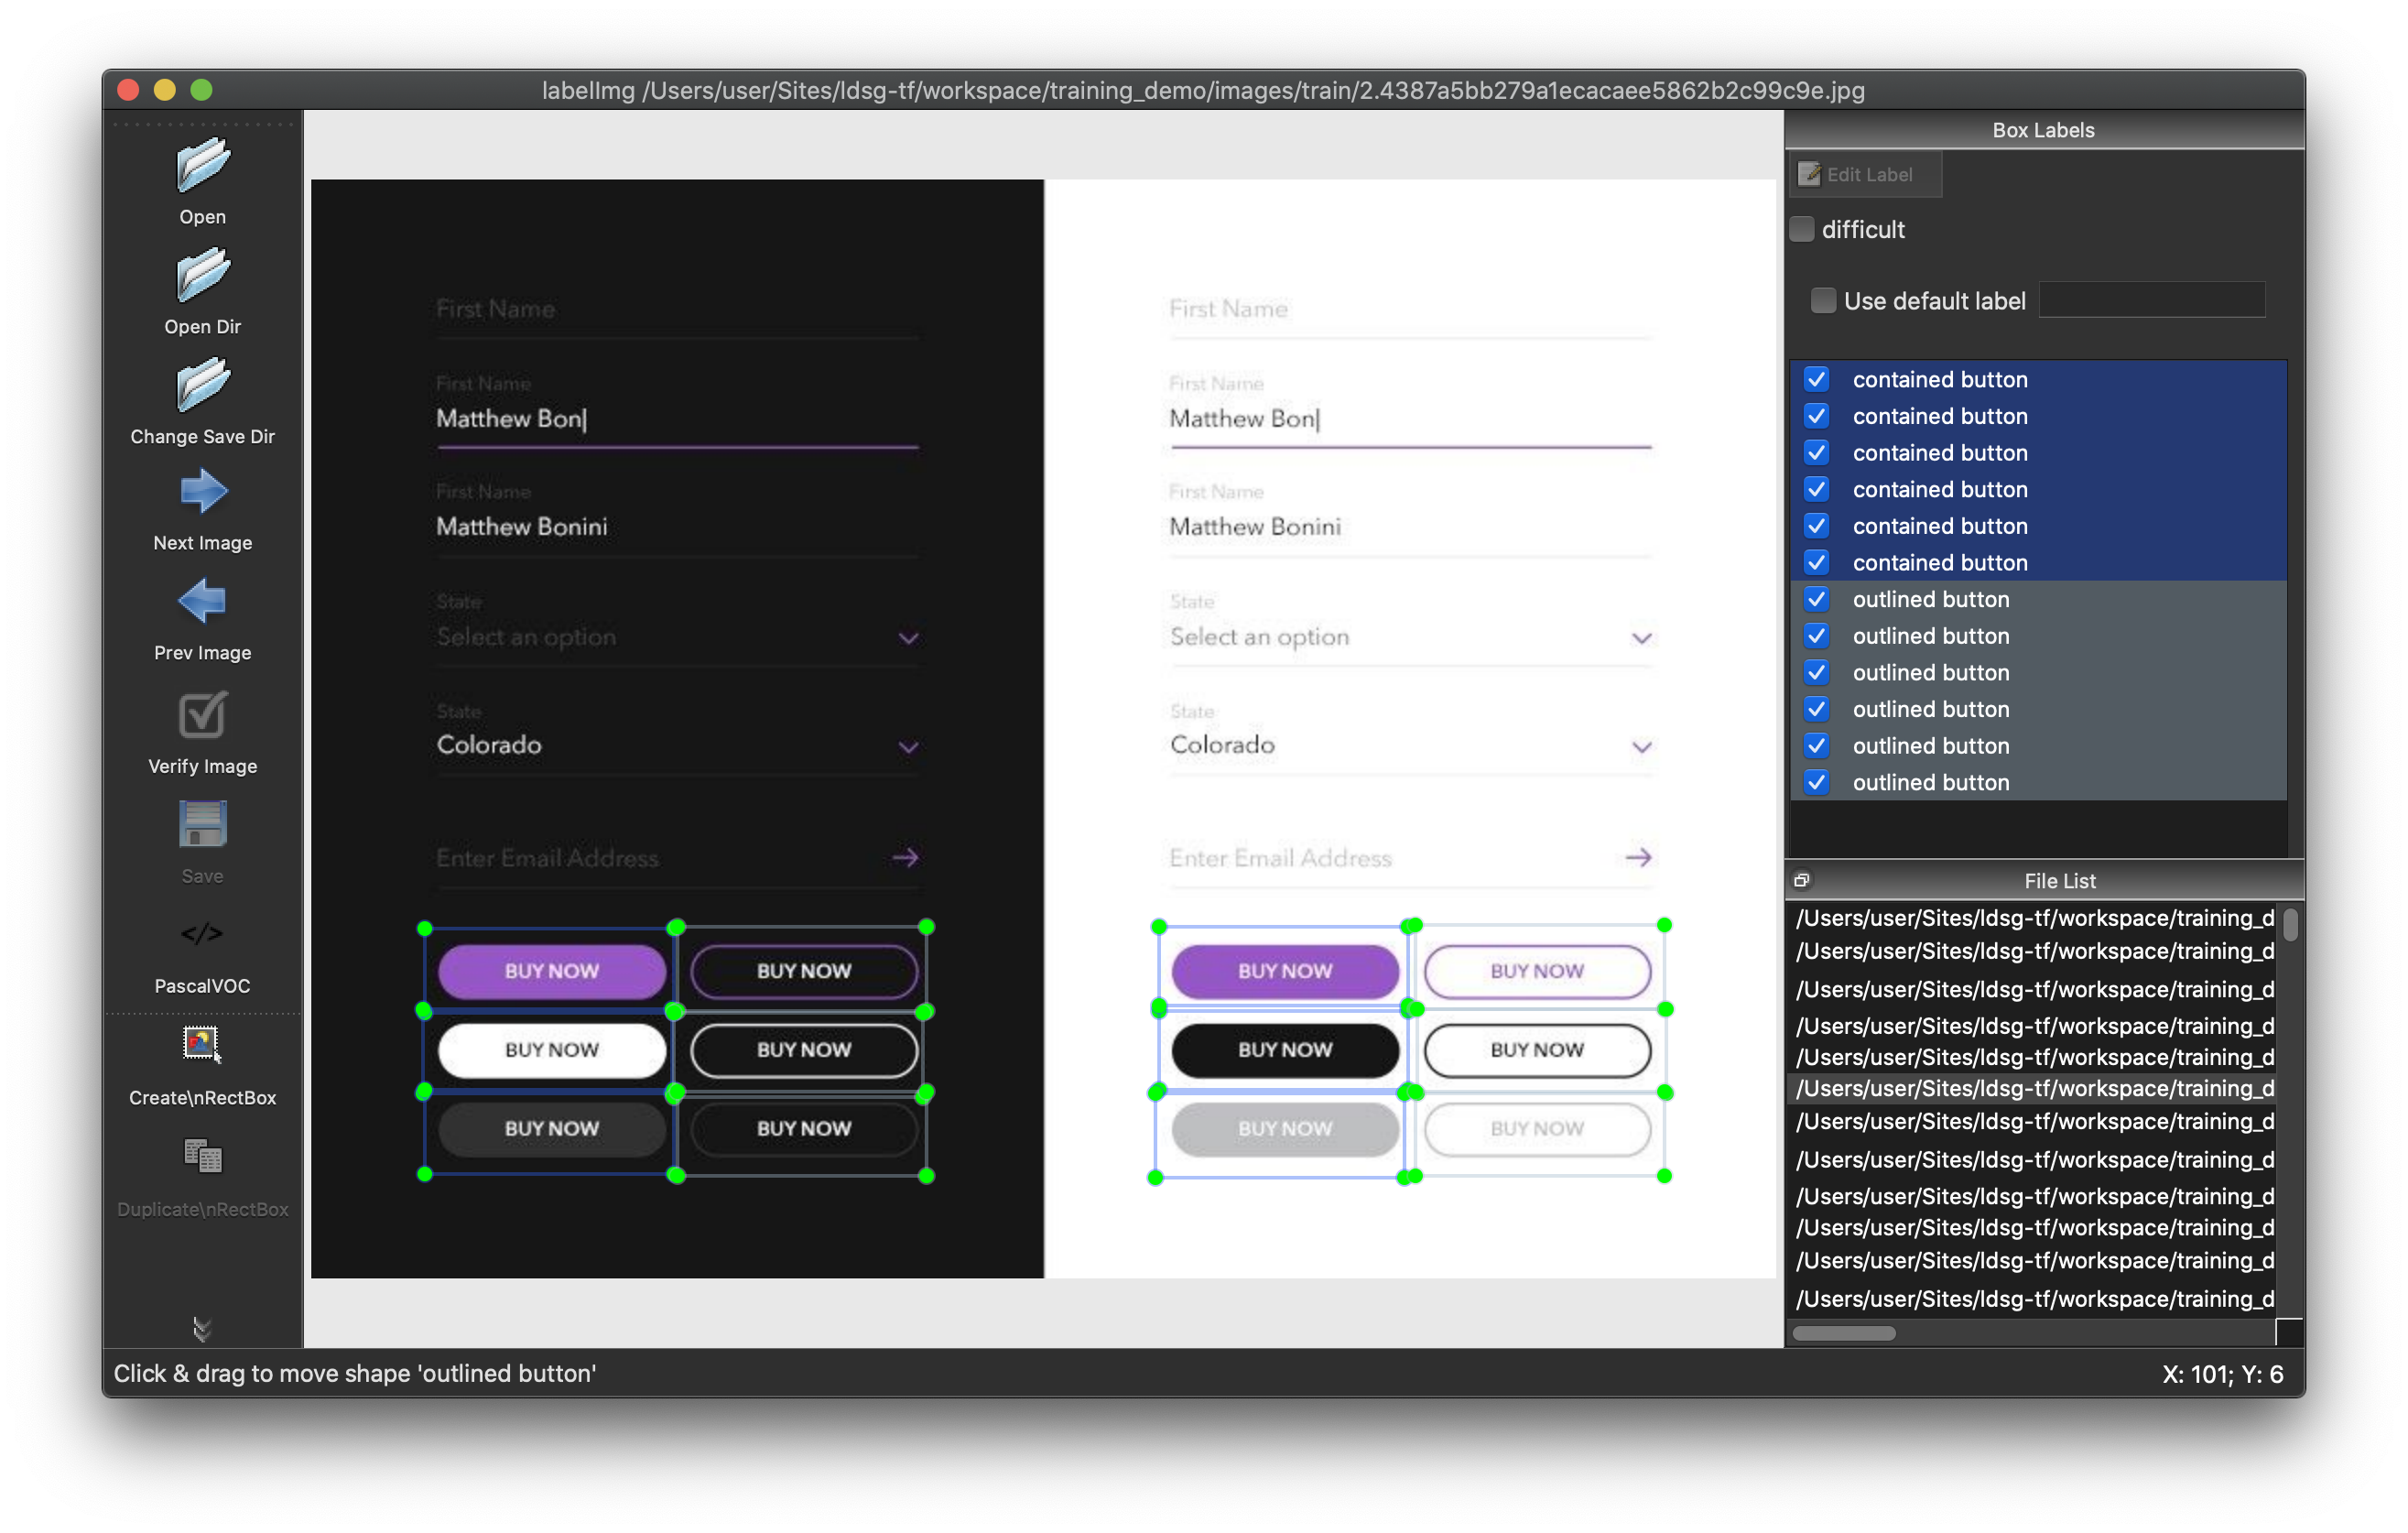
STEP 3. Labeling data
In order to label our data, we need some kind of labeling software. In this particular case we are going to use labelimg.
According to the rules of my design system, I created a label by classifying it into 4 categories: contained button, outlined button, icon button, and ghost button. It seems easy and repetitive task, but it’s super time consuming. In my case, I used labelimg to label about 200 images, which took over an hour.
Next, we need to create a label map, which namely maps each of the used labels to an integer values. We will put it in the training_demo/annotations folder with the name labelmap.pbtxt. Below we show an example label_map.pbtxt, assuming that our dataset containes 4 labels:
1
2
3
4
5
6
7
8
9
10
11
12
13
14
15
16
item {
  id: 1
  name: 'contained button'
}
item {
  id: 2
  name: 'outlined button'
}
item {
  id: 3
  name: 'icon button'
}
item {
  id: 4
  name: 'ghost button'
}
STEP 4. Generate the TF RECORDS
Now that we have generated our annotations and split our dataset into the desired training and testing subsets, it is time to convert our annotations into the so called TFRecord format.
Thankfully, many pioneers have already created scripts to convert xml to record format. All we need to do in this phase is just download their Python script, save it inside TensorFlow/scripts/preprocessing, and execute commends below:
1
2
3
4
5
6
7
## cd TensorFlow/scripts/preprocessing

# Create train data:
python generate_tfrecord.py -x [PATH_TO_IMAGES_FOLDER]/train -l [PATH_TO_ANNOTATIONS_FOLDER]/label_map.pbtxt -o [PATH_TO_ANNOTATIONS_FOLDER]/train.record

# Create test data:
python generate_tfrecord.py -x [PATH_TO_IMAGES_FOLDER]/test -l [PATH_TO_ANNOTATIONS_FOLDER]/label_map.pbtxt -o [PATH_TO_ANNOTATIONS_FOLDER]/test.record
Source: https://tensorflow-object-detection-api-tutorial.readthedocs.io
Once the above is done, there should be 2 new files under the training_demo/annotations folder, named test.record and train.record, respectively.
STEP 5. Training configuration
For the purposes of this tutorial we will not be creating a training job from scratch, but rather we will reuse one of the pre-trained models provided by TensorFlow. If you would like to train an entirely new model, you can have a look at TensorFlow’s tutorial.
The model we shall be using in our examples is the ssd_mobilenet_v2_320x320_coco17_tpu-8 model, since it provides a relatively good trade-off between performance and speed. However, there exist a number of other models you can use, all of which are listed in TensorFlow 2 Detection Model Zoo.
Clicking on the name of your model should initiate a download for a *.tar.gz file. and extract its contents inside the folder training_demo/pre-trained-models. our training_demo directory should now look as follows:
1
2
3
4
5
6
7
8
training_demo/
├─ ...
├─ pre-trained-models/
│  └─ ssd_mobilenet_v2_320x320_coco17_tpu-8/
│     ├─ checkpoint/
│     ├─ saved_model/
│     └─ pipeline.config
└─ README.md
Now that we have downloaded and extracted our pre-trained model, let’s create a directory for our training job. Under the training_demo/models create a new directory named my_ssd_mobilenet_v2_320x320_coco17_tpu-8 and copy the pipeline.config file inside the newly created directory. Our training_demo/models directory should now look like this:
1
2
3
4
5
6
training_demo/
├─ ...
├─ models/
│  └─ my_ssd_mobilenet_v2_320x320_coco17_tpu-8/
│     └─ pipeline.config
└─ ...
Now, let’s have a look at the changes that we shall need to apply to the pipeline.config file. Please refer to the two links below for more detailed settings.
STEP6. Do Training!
Before we begin training our model, let’s go and copy the TensorFlow/models/research/object_detection/model_main_tf2.py script and paste it straight into our training_demo folder. We will need this script in order to train our model.
Now, to initiate our new training job, open a new Terminal, go to the training_demo folder and run the following command:
1
python model_main_tf2.py --model_dir=models/my_ssd_mobilenet_v2_320x320_coco17_tpu-8 --pipeline_config_path=models/my_ssd_mobilenet_v2_320x320_coco17_tpu-8/pipeline.config
If everything was setup correctly the training should begin shortly. Then in the terminal you will see the log as below. Not surprisingly, time varies widely depending on the computer’s performance and the size of the pre-trained model. For my Macbook Pro 15 (2018-mid), it took about 2.5 hours to train 3000 steps. Please refer to it when you configure training.
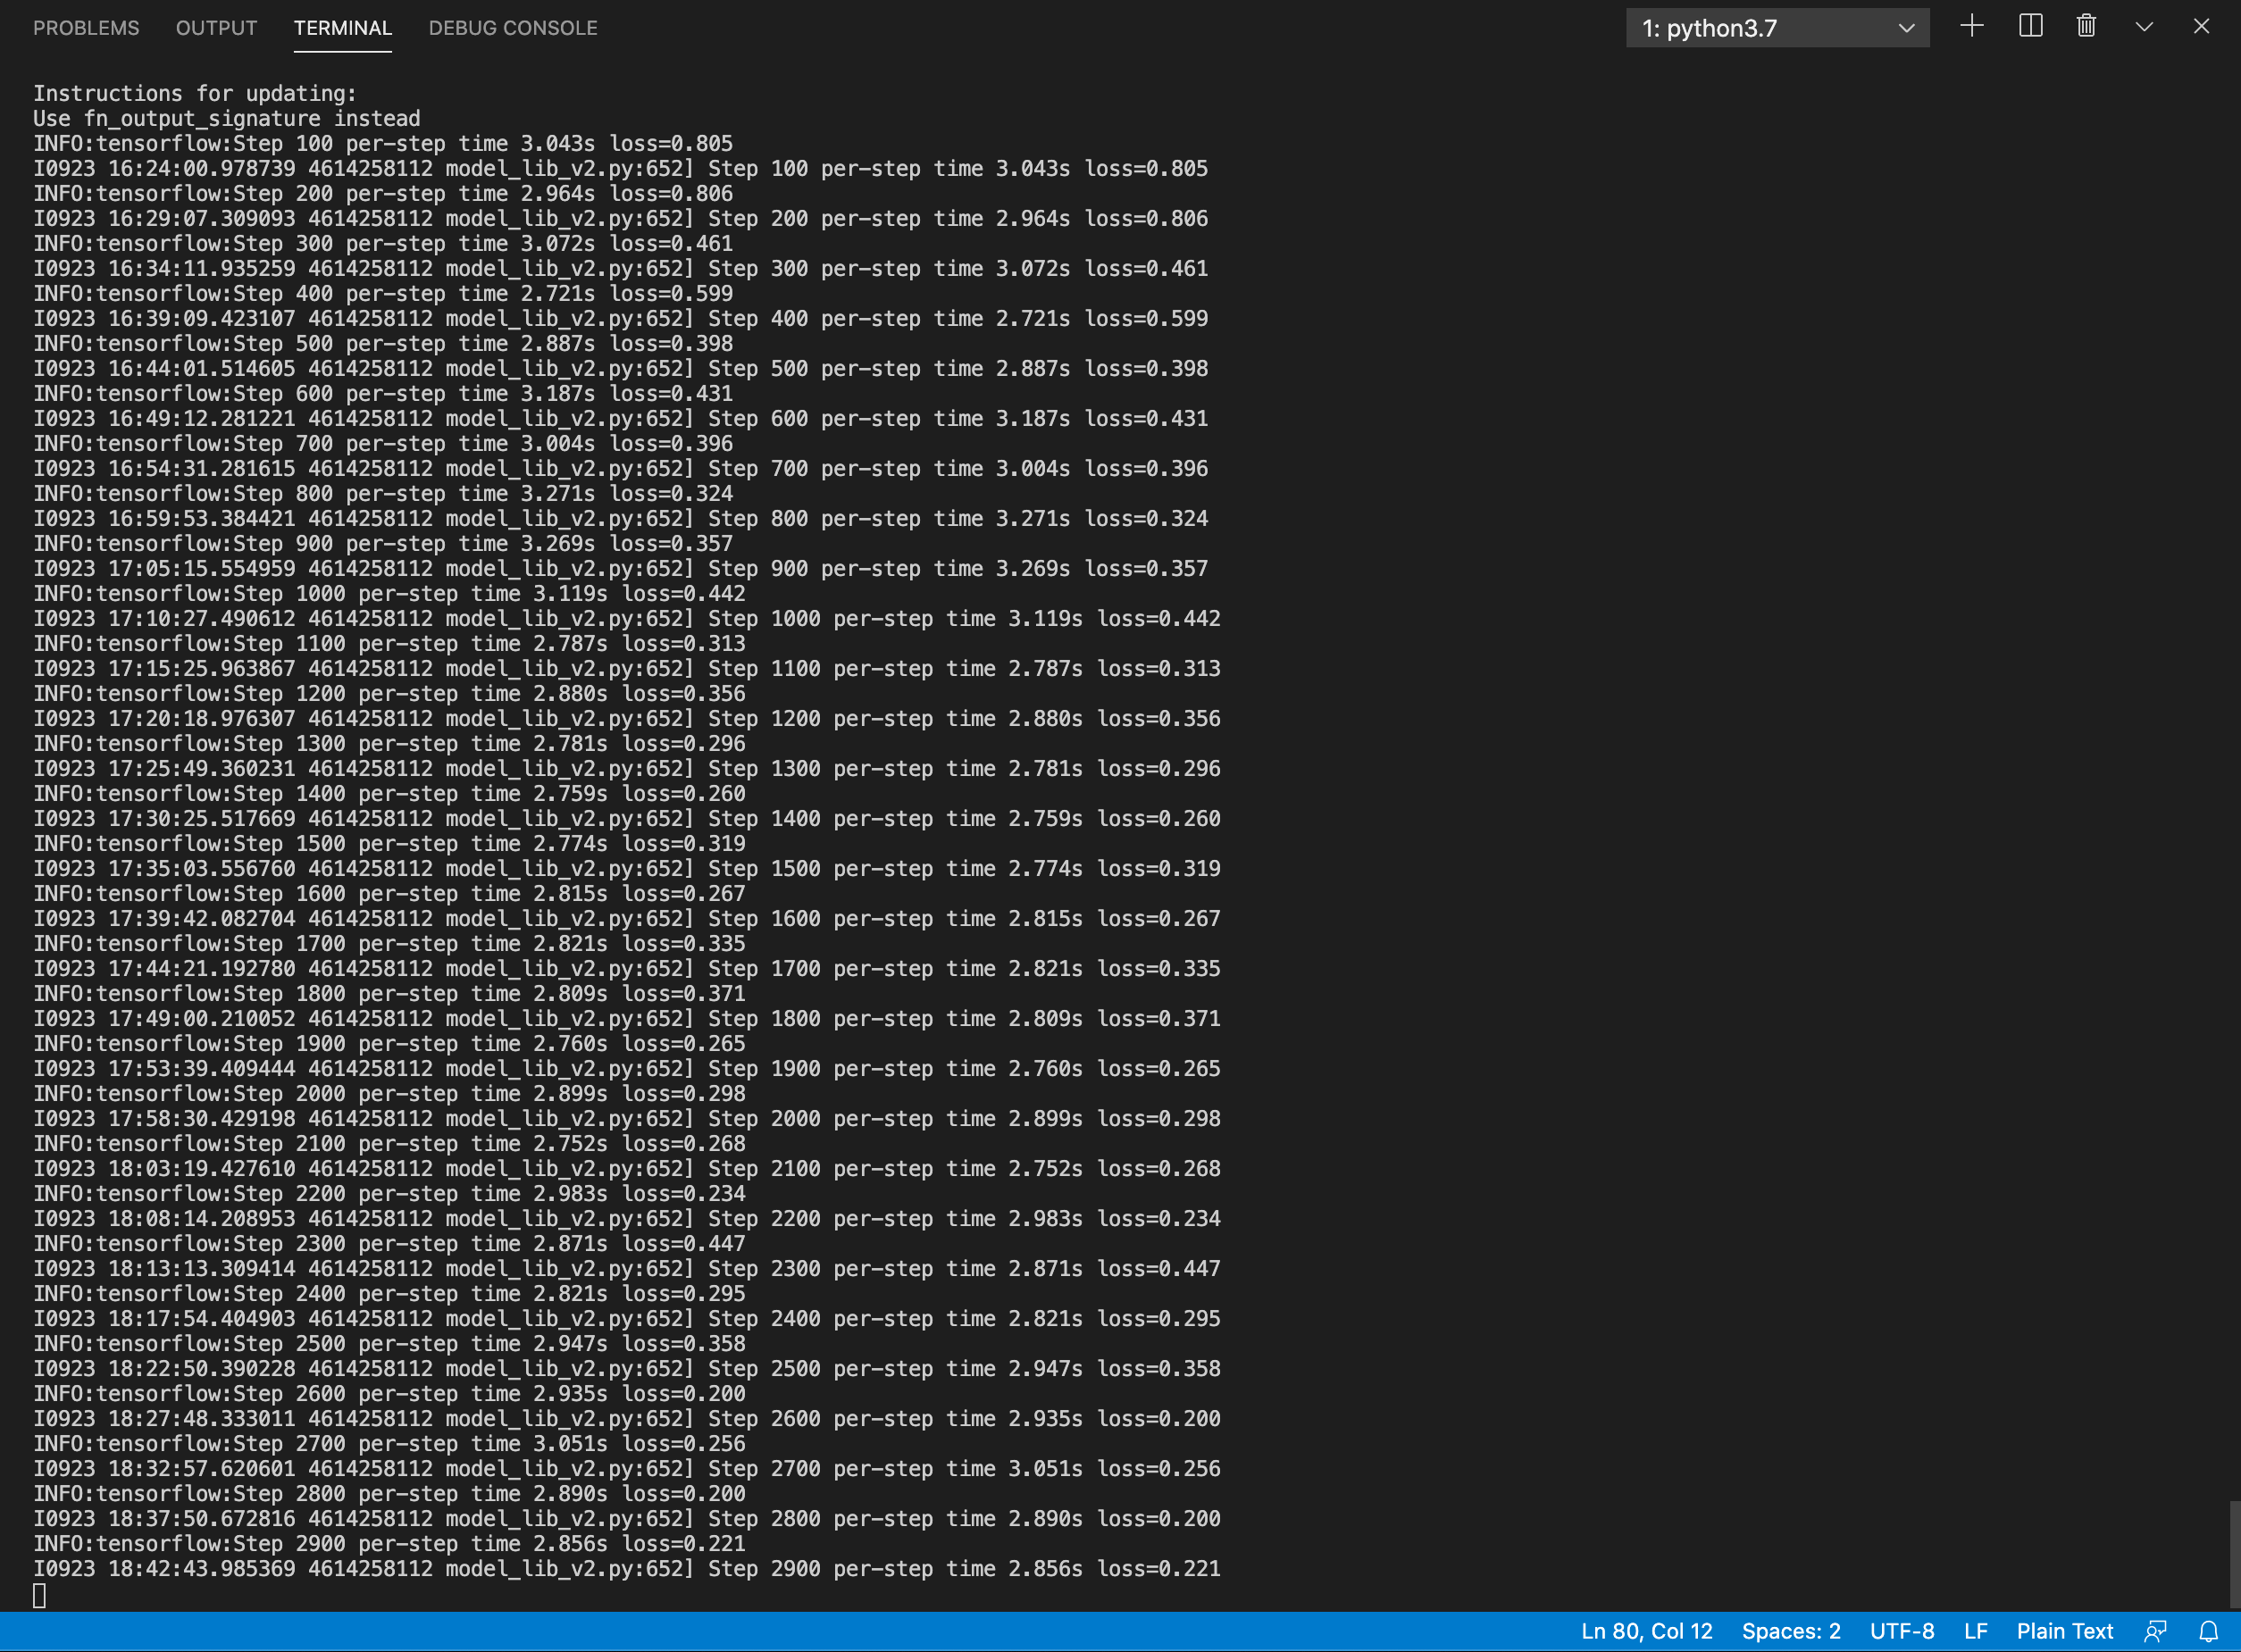
Training model progress
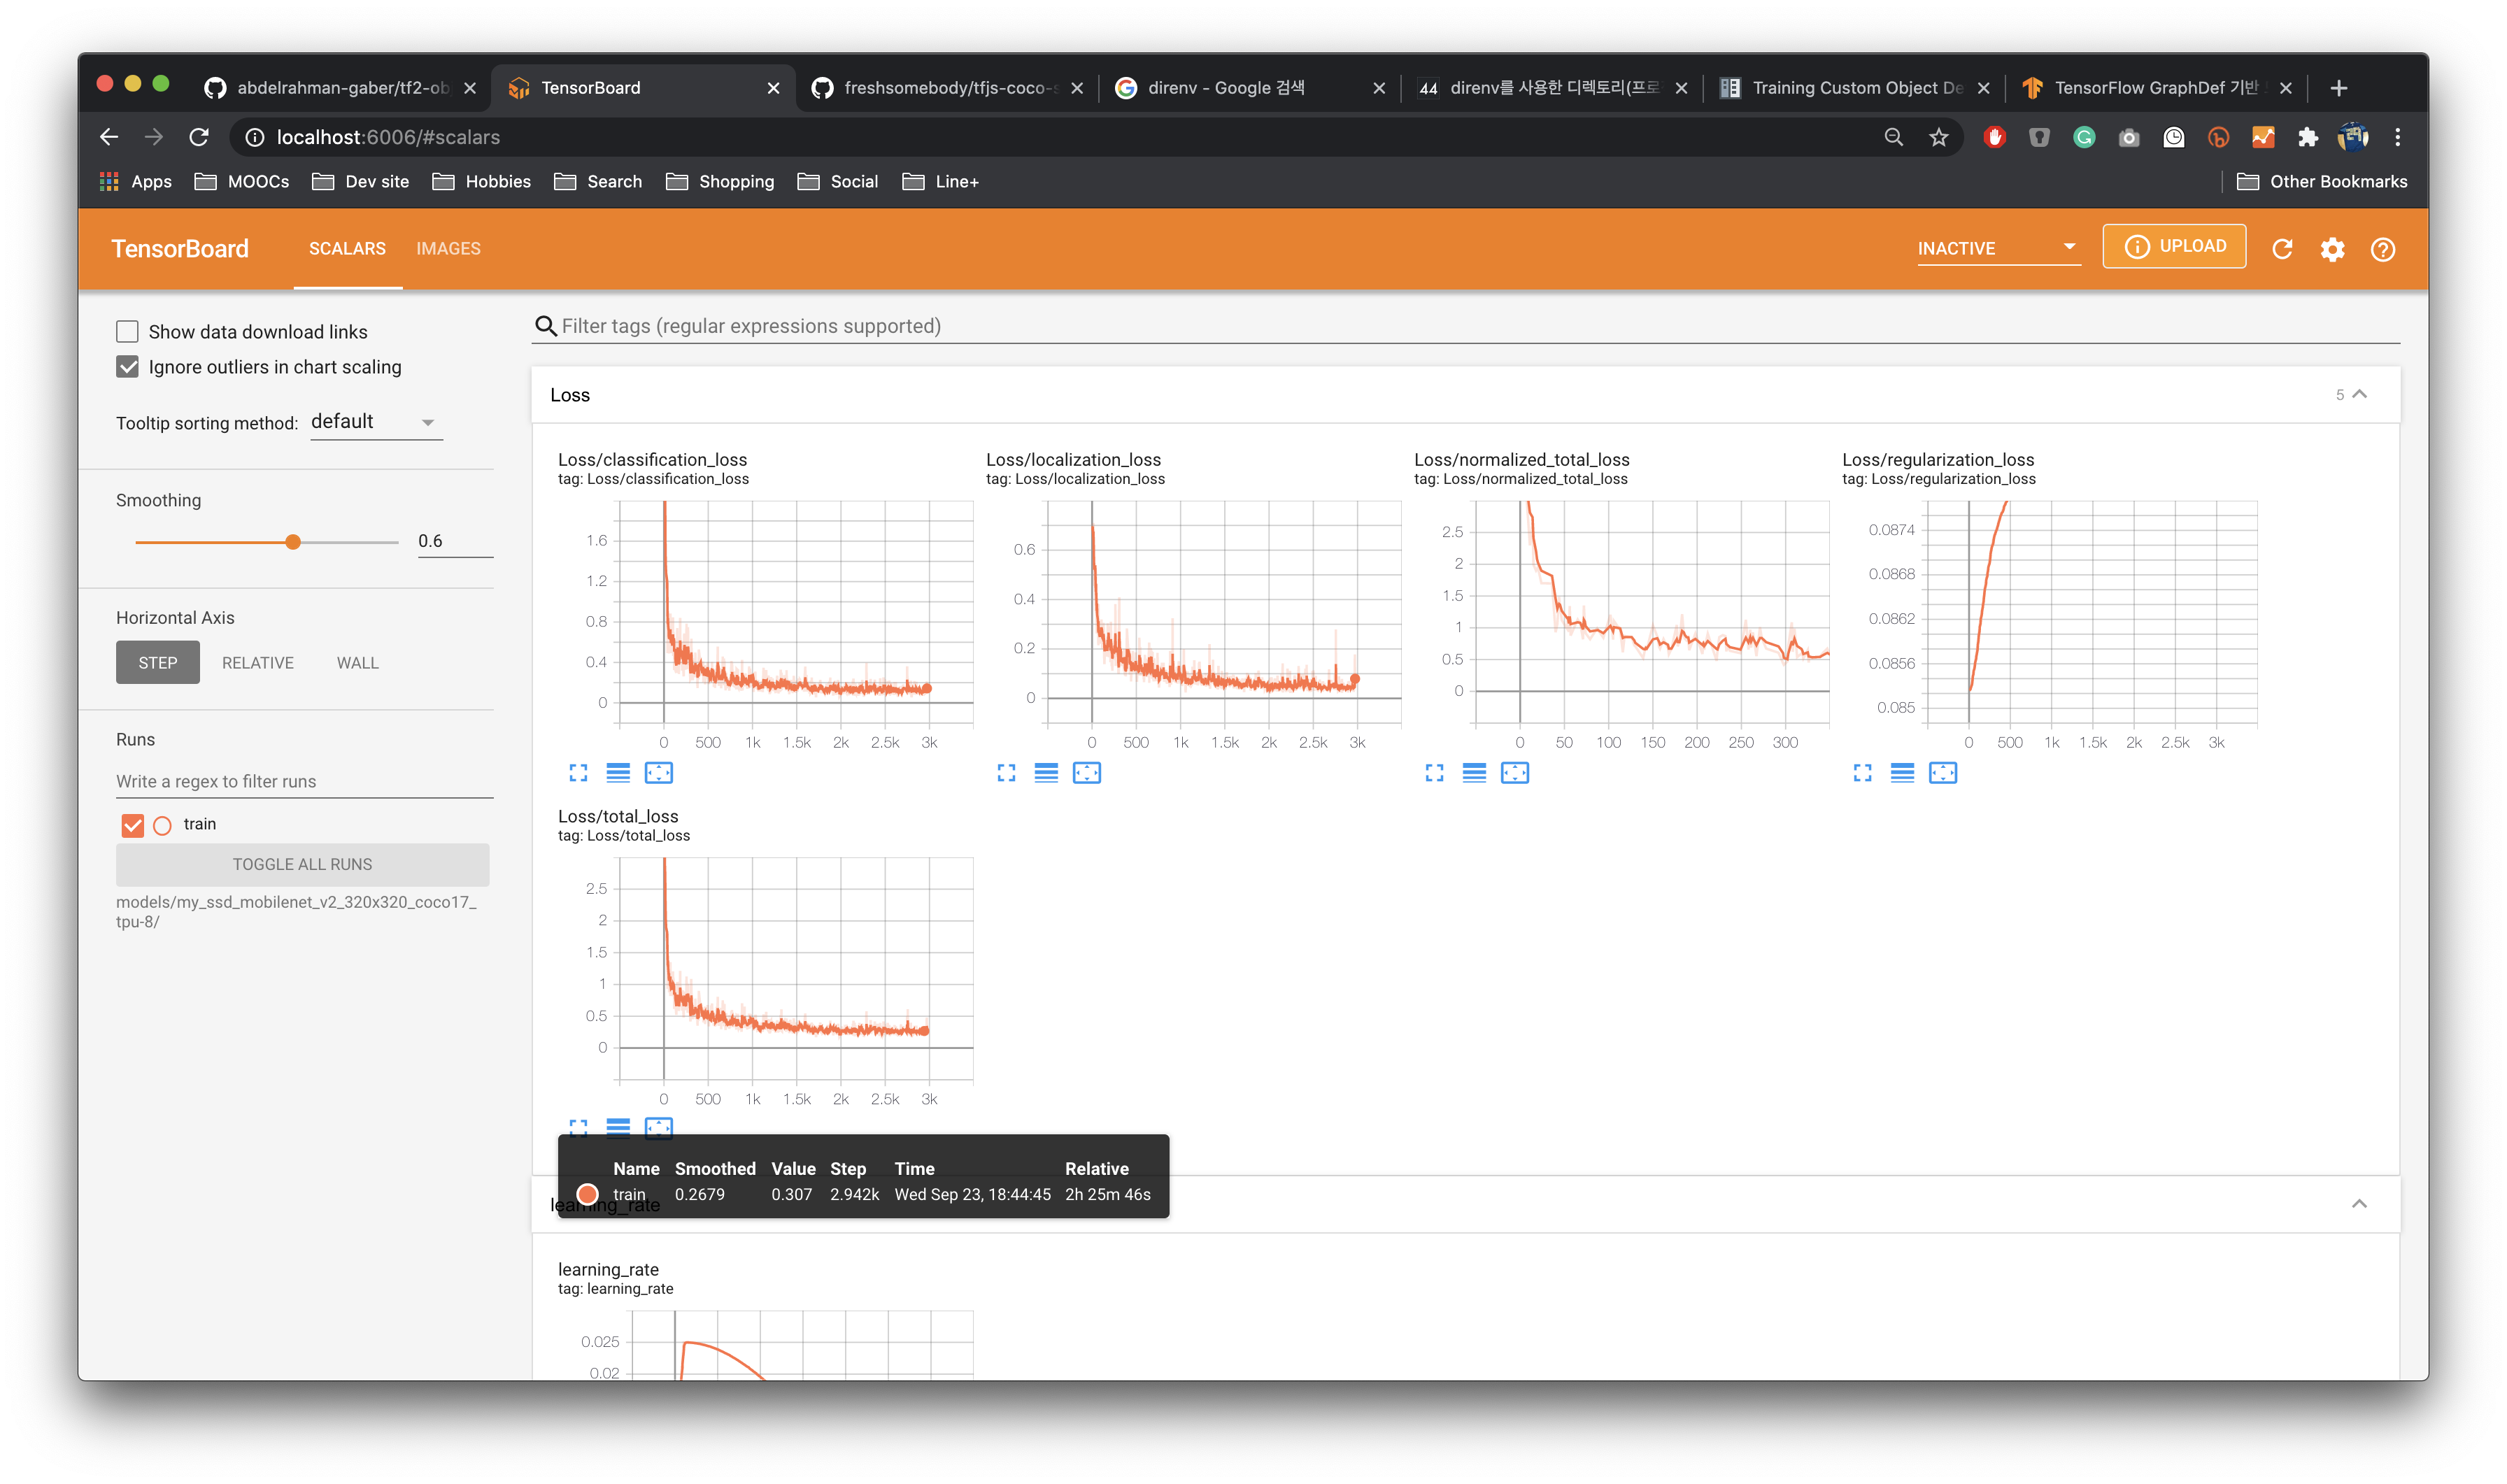
the current loss gets logged to Tensorboard. We can open Tensorboard by opening a second command line, navigating to Tensorflow folder and typing:
1
tensorboard --logdir=models/my_ssd_mobilenet_v2_320x320_coco17_tpu-8
Then a web page will be opened autometically at localhost:6006
In the case of me, who is not familiar with deep learning, there is a problem of **“I don’t know what number it is.” Anyway, it was a useful tool to see my progress.
STEP6. Exporting a Trained Model
Once your training job is complete, you need to extract the newly trained inference graph, which will be later used to perform the object detection. This can be done as follows:
- Copy the
TensorFlow/models/research/object_detection/exporter_main_v2.pyscript and paste it straight into yourtraining_demofolder. - Now, open a Terminal, go to
training_demofolder, and execute the following command:
1
python .\exporter_main_v2.py --input_type image_tensor --pipeline_config_path .\models\my_efficientdet_d1\pipeline.config --trained_checkpoint_dir .\models\my_efficientdet_d1\ --output_directory .\exported-models\my_model
After the above process has completed, you should find a new folder my_model under the training_demo/exported-models, that has the following structure:
1
2
3
4
5
6
7
8
training_demo/
├─ ...
├─ exported-models/
│  └─ my_model/
│     ├─ checkpoint/
│     ├─ saved_model/
│     └─ pipeline.config
└─ ...
Let’s Test!
The button that I use most frequently in the era of COVID-19 in here South Korea is the QR check-in function of NAVER/KAKAOTALK app. I video-recorded these screen-flow from my iPhone and tested whether our new machine learning model can find the button well. The test tool was used by copying the Abdelrahman G. Abubakr’s test script that I used above
Expect.. expect.. expect..
BOOOOM! Of course, it’s not perfect, such as finding only 1 icon button… But Contained buttons like’OK’ and’Cancel’ are definitely finding! 🍺
Next steps
The next step is to convert the newly created model to tensorflow js and make it available to Sketch assistant based on Node js. But this part requires another study, so I will take a break before proceeding.
In addition, I realized that the process of creating pre-trained model with custom dataset is a huge amount for individuals not to do alone. Instead, I decided to suggest design communities making a pre-trained model together via open source.
Looking at the examples in visualdata.io or [tf2 detection model zoo, there are many datasets that can be used in machine learning by numerous contributors, but unfortunately, there seems to be no dataset that detects UI objects yet.
Starting this blog post, If there is a chance, I will share my experiences with the communities in Korea and try to move on next together. If you are also interested in this project, thank you!! Please find me in the Facebook group below.